Kamagra gibt es auch als Kautabletten, die sich schneller auflösen als normale Pillen. Manche Patienten empfinden das als angenehmer. Wer sich informieren will, findet Hinweise unter kamagra kautabletten.
Camp.se
Sitting Walking And Standing Hip orthosis
Fitting and Customization
TABLE OF CONTENTS
SWASH® Components
Product Selection
Product size & Upright selection
Initial Application
Initial Adjustments
Initial Function, Evaluation & Customization
The Professional Finish
Prerequisite reading:
For a successful fitting, read the following sections included
in the SWASH® Clinical Manual (available separately):
• Biomechanics of SWASH®
• Indications & Contraindications
• Candidate Selection
• Pre and Post Fitting Functional Evaluation
• Protocols and Proper Fit Guidelines
Primary development goals of the SWASH®
1. Increase abduction and stretch hip adductors to
improve and maintain hip alignment2. Prevent excessive adduction during sitting and walking3. Optimize sitting and standing posture4. Achieve the above goals with an automatic transition from neutral (walking, standing) to abduction (sitting)
SWASH® COMPONENTS
28801 Leg Bars 115o
28802 Leg Bars 123o
28803 Thigh Cuffs w/padding
28804 Pelvic Padding
28805 Joint Set (1)
28806 Boss Cover (2)
28807 Clamp Ring for Leg Bars (2)
28809 Brass Bushings for Thigh Cuff (10)
28810 Slide buckle for waistband
28811 Waistband screw set
28812 Waistband webbing with snap (1)
28813 Rubber Stoppers, Size 1 (set of 2) H
Size 2-4 (set of 10) IMPORTANT: Specify needed for Classic
28814 Thigh Cuff Padding (2)
28815 Buckle with snap for Thigh Cuff (1) V
28820 Allen key, set of 4
Low Profile II
Pelvic Padding with Abdominal Pad 1, 2
Thigh Cuffs w/padding
Thigh Cuff padding (2)
28846/47 Abdominal Pad
Buckle with snap for Thigh Cuff (2) 5
Rubber stoppers (set of 10)
IMPORTANT: Specify needed for Low Profile
Allen Key, set of 4
This product should only be fitted by a certified professional.
SWASH® COMPONENTS
Upright lengths
Pelvic Section - Distance Between Joint Centers
Measurements are taken on flat plate before bending.
PRODUCT SELECTION
Before you begin
If it is not possible to meet with the rest of the "team" working with this patient, at least call
the referral source, therapist, and caregiver to discuss primary and secondary goals for this
orthosis. This will affect whether you select SWASH® Classic or SWASH® Low Profile II,
115 or 123 degree upright, plus the adjustment you make to the orthosis. The Pre-Fitting
Evaluation (see SWASH® Clinical Manual) is key to success and, combined with the Post-
Fitting (see SWASH® Clinical Manual) serves as a means for you to document outcomes.
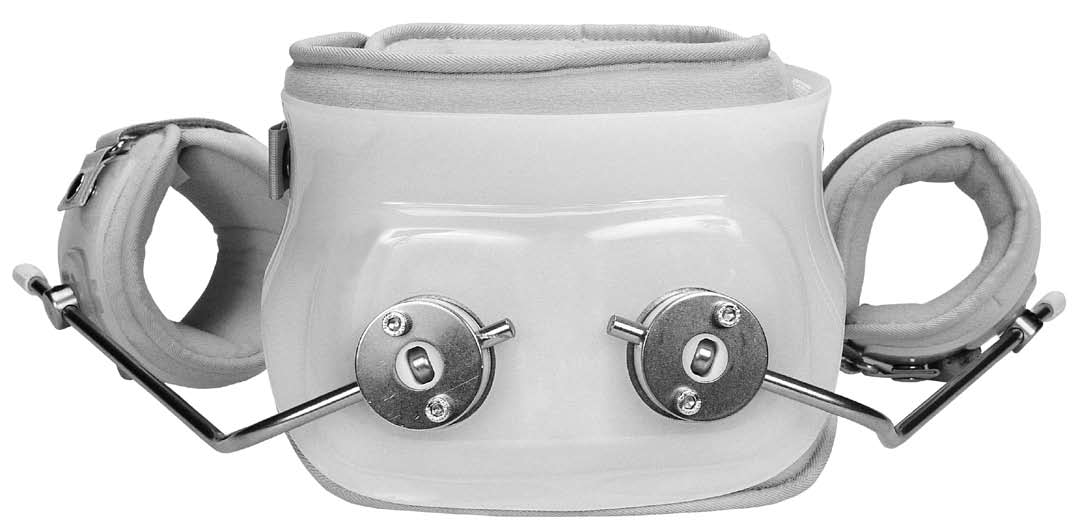
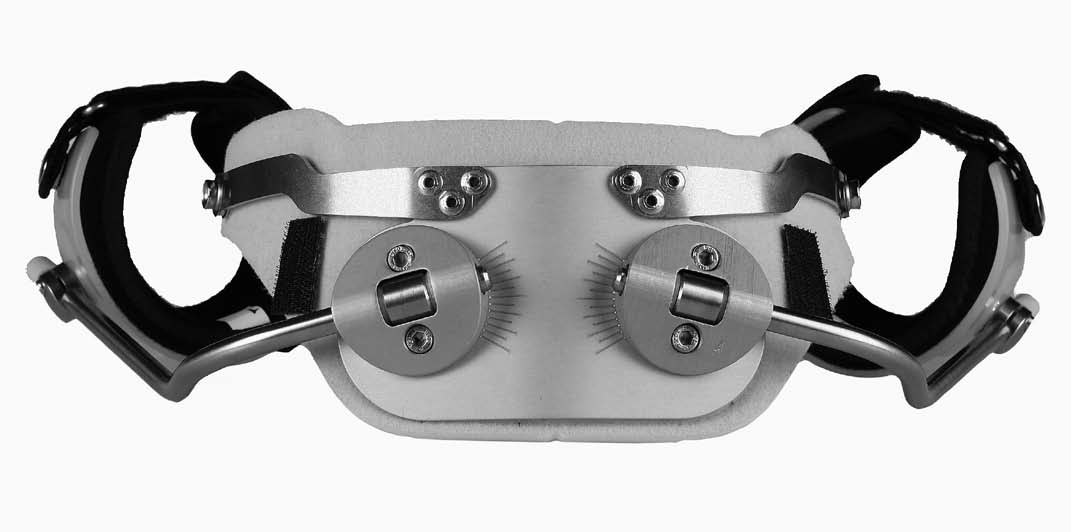
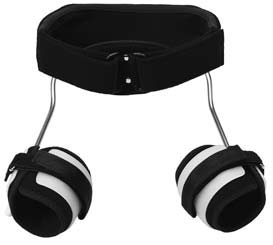
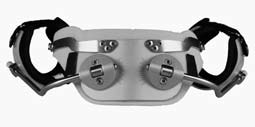
SWASH® Low Profile II
The original design of SWASH® uses a plastic anterior over-
SWASH® LP II uses a metal pelvic band with padded iliac
lap pelvic band to secure the orthosis around the waist and
extensions that are to be shaped and positioned between
maintain its position, resting over the ASIS, just below the
the crest of the ilium and the ASIS. The double strap front
navel. In the back, the pelvic section extends from L2/L3 to
closure allows for symmetrical application. In the back,
the distal margin of the sacrum, providing maximum pelvic
the padded metal posterior frame extends from approx-
support. Children with low trunk tone and/or very limited
imately L2/L3 to S1/S2. The metal offers positive non-slip
trunk control strength may benefit from the increased
contact for the abduction control joints, and includes clear
posterior and lateral support this design offers. The thigh
markings to monitor abduction settings. The joints are
cuff closure is a double-lock strapping system to reduce
tapered downward to accommodate most walker styles.
chances of unwanted removal by children. Pelvic band and
The thigh cuff closure is a simple double Velcro fold-back
thigh cuff padding are removable for laundering.
closure for easy donning and doffing. The pelvic band cover and thigh cuff padding are removable for laundering.
The uprights are 6mm (size1) and 7mm (sizes 2-4) diameter.
The uprights for all sizes are 8mm diameter. This increase
The smaller diameter uprights on the size 1 allow more
in diameter offers added strength to manage very high
"spring", permitting less restriction of movement. This is
tone, plus it allows cuffs to be completely interchangeable
often desirable for the developing infant.
between all sizes.
Guidelines for Product Selection
The following are offered as general guidelines only. When possible, it is recommended
to try each style on the patient to best assess which offers optimum function.
SWASH® Classic
SWASH® Low Profile II
• When maximum trunk control is required, i.e.,
• When the primary goal is to control scissoring gait
for the candidate who lacks muscle strength
and the posterior joints on the SWASH® Classic interfere
or upper body control to sit upright.
with posterior walker, and a new walker is not an option.
• When patient is primarily non-ambulatory
• When wearer has limited space between
the iliac crest and the rib cage.
• When a smaller diameter (6mm) uprights on
• When maximum upright strength is required to manage
the size 1 are desired to permit less restriction
adductor tone.
• When candidate and/or caregiver acceptance of
• When the greater pelvic coverage area triggers
"bracing" is an issue. The Low profile is more
more desirable neuro-sensory motor response.
cosmetically acceptable to many.
PRODUCT SELECTION
115 or 123 Degree Uprights?
SWASH® is available with either 115° or 123° uprights.
This refers only to the fixed angle of the most proximal
visible curve in the uprights – it does NOT refer to the
exact degree of abduction obtained while wearing the
orthosis. Standing and walking functions of both uprights are very similar. Generally the differences between the two are
related to sitting function, with the 123° uprights creating greater amounts of abduction and the 115° uprights crea-ting relatively smaller amounts of abduction.
NOTE: In sitting, the 123o uprights will have a greater influ-ence towards posterior pelvic rotation, thereby increasing the flexion influence on the trunk.
The selection of the 115 or 123-degree uprights does have an affect on the postural outcome of the fitting. The following are offered as guidelines:
123 Degree - Wide Sitting Base
115 Degree - Narrow Sitting Base
When the greatest amount of adductor
The wearer is primarily chair mobile and
muscle lengthening in the sitting position
the 123° uprights would be too wide in
the sitting position for the child to fit in chair or car seat, and a new chair or car
When more trunk lumbar flexion influ-
seat is not an option.
ence is desired when sitting.
Adductors are too tight and the amount of abduction when sitting in the 123°
When more lumbar extension is desired
during gait.
uprights would be impossible or painful.
When less trunk flexion influence desired when sitting.
PRODUCT SIzE & UPRIGHT SELECTIOn
PELVIC SECTION CIRCUMFERENCE
Pelvic section circumference
Sizing guide
At level of the anterior superior iliac spine (ASIS).
Use the table below to select the largest size that will fit the child, based on the measurements, to allow optimum
room for growth. Keep the following in mind:
Distal thigh, just proximal to the condyles. When fitted, the
• The plastic on the cuffs and the pelvic band (SWASH®
ends of the thigh cuffs should almost meet (to allow for
Classic only) may be trimmed, if necessary.
• The pelvic band on SWASH LP II may be shaped to fit slightly larger or smaller pelvic circumference.
Upright length
Distance from waist to mid-patella with knees extended.
Interchangeability of Components
• For SWASH® Classic: All components on sizes 2, 3, and
For SWASH® Classic only, size 1 uses 6mm diameter
4 units are modular and interchangeable. A size 1 thigh
uprights and sizes 2, 3, and 4 use 7 mm uprights. All sizes
cuff is available for a size 2 upright (size 1A).
SWASH® LP II use 8 mm diameter uprights. Level of func-
• For SWASH® L.P II. : Al components are interchangeable
tion and tone (not just the size chart) should be evaluated
between sizes.
when selecting the proper diameter upright.
• SWASH Classic and LP II components cannot be combined.
• The uprights almost always require trimming (after final fitting approval) so that the distal tips are level with the bottom of the cuff padding.
SWASH® SIZING CHART
Pelvic section
Thigh cuffs
Proximal
in mm and inches.
meter Length
400-465 15 3/4-18 1/4 210-250
460-550 18-21 3/4
250-290 9 3/4-11 1/2 7
540-630 21 1/4-24 3/4 290-330 11 1/2-13
620-720 24 1/2-28 1/4 330-380 13-15
400-465 15 3/4-18 1/4 210-250 8 1/4-9 3/4
460-550 18-21 3/4
250-290 9 3/4-11 1/2 8
PROFILE II SIZE 3
540-630 21 1/4-24 3/4 290-330 11 1/2-13
620-720 24 1/2-28 1/4 330-380 13-15
800-900 31 1/2-35 1/2 440-500
1. Remove retainer rings from the uprights
The uprights are labeled "Right" and "Left" to correspond
to the extremity on which they are fit. To assemble the
uprights to the pelvic band: Use the Allen Key to loosen the
set screw and slide the retainer ring off from the upright.
2. Insert retainer rings into joint assemblies
Insert the retainer rings into the center of the hip joint
with the hex-screw pointing up.
SWASH® Low Profile II
Pelvic section
Thigh cuffs
Proximal
3. Insert and secure uprights into joint
4. Symmetrical uprights
meter Length
Repeat with the opposite side, making certain that both
Insert the uprights into the hip joint assembly and through
uprights are inserted equal distance through the joint
400-465 15 3/4-18 1/4 210-250
the retainer ring.
assembly so they are symmetrical.
460-550 18-21 3/4
250-290 9 3/4-11 1/2 7
540-630 21 1/4-24 3/4 290-330 11 1/2-13
Make certain the groove in the upright faces up and is
620-720 24 1/2-28 1/4 330-380 13-15
aligned with the set screw in the retaining ring. Tighten the set screw until it is securely seated into the groove in the
400-465 15 3/4-18 1/4 210-250 8 1/4-9 3/4
460-550 18-21 3/4
250-290 9 3/4-11 1/2 8
540-630 21 1/4-24 3/4 290-330 11 1/2-13
620-720 24 1/2-28 1/4 330-380 13-15
800-900 31 1/2-35 1/2 440-500
INITIAL APPLICATION
SWASH® Low profile
SWASH® Low profile
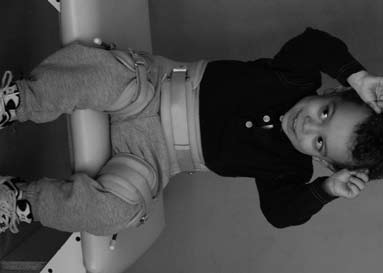
1. Position the orthosis on the patient
2. Adjust the orthosis to fit the patient:
(in supine position):
SWASH® Classic pelvic band
The pelvic section should encase the Anterior Superior Iliac
Mark appropriate holes for both truss studs in the waist-
Spine (ASIS), low enough that the navel is visible in the
band. The studs should fit in the center of the slots in the
overlap tab. The dual stud design provides intrinsic stability
Ideal is to fit the orthosis at mid-pelvic girdle to obtain firm
to the pelvic band.
grasp and control of the pelvis. Depending on anatomy, final fitting location may vary from just below the waist
SWASH® Low Profile pelvic band
(navel) to mid-pelvic girdle
Position the pelvic band extensions between the crest of the ilium and
Check the ASIS relative to the posterior section of pelvic
the ASIS. The pelvic band should be
band on both sides to ensure symmetry in pelvic height
shaped to the contour of the pelvis
and that the orthosis is not rotated on the patient.
and extend no more than 5 cm (2 inches) toward anterior midline.
SWASH® Low profile
3. Check the fit of the pelvic band:
Slide the fingers of one hand between the padding and the
patient's abdomen with hips alternately flexed and exten-
ded to ensure a snug yet comfortable fit.
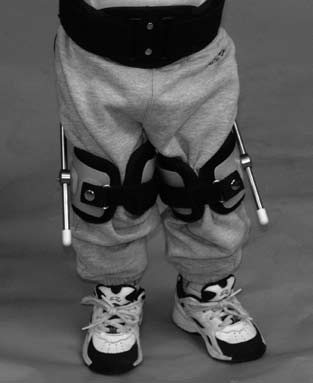
4. Thigh cuffs
Initially, position the thigh cuffs as distal as possible wit-
hout creating pressure in the popliteal area and without
interfering with flexion. However, pressure on the thorax,
excessive spinal flexion, or discomfort due to hamstring
tightness, may be relieved by moving the cuffs up 1-3
inches. Mark on the uprights where the cuff should be se-
cured. If the cuffs are too large, mark on the cuff where it
should be trimmed for recommended fit (do not trim until
after initial fitting as it is possible you will find it necessary
to move the cuffs up higher on the thigh to resolve posture
or comfort issues).
5. Mark location for thigh cuffs:
NOTE: The thigh cuff is a cone shape - greater circum-
ference should be at the top. The straps close to the
lateral side.
INITIAL ADJUSTMENTS
Remove the orthosis from the child. Make all necessary changes
to the orthosis while it is off the child.
Pelvic band adjustments
SWASH® Low profile
SWASH® Low profile
SWASH® Classic
Loosen the large screws in the outer ring of the hip joint
Move pelvic band truss studs to marked holes.
assemblies. Rotate the joints to set amount of abduction
Tighten with Phillips screwdriver.
needed to improve sitting and standing posture, and/or
SWASH® Low Profile
prevent scissoring during standing and walking, or to meet
Remove the cloth cover. Based on your observations
post-operative protocols, and then tighten.
during inital fitting - hand shape the metal frame that forms the iliac extension - maintain symmetry.
Adjust uprights for hip clearance
SWASH® Low profile
Adjust equally the distance that the upright passes through
More (left photo) or less (right photo) abduction may be
the hip joint assembly and tighten. This setting may need to
needed depending on the child's hip alignment and functio-
be changed after the orthosis is tested on the patient.
nal performance.
Note: Loctite® or other adhesives are not generally
necessary to maintain secure settings on the SWASH®.
Maintain symmetry: The orthosis should be set up
to be symmetrical in every aspect. Most children with
cerebral palsy present with both postural and functional
Move thigh cuff to the marked position on uprights, rotate
asymmetries. The SWASH® should be set up and used
slightly laterally and tighten. Move other thigh cuff to the
symmetrically for two to four weeks in an attempt to help
same height and rotation.
the child become more symmetrical.
Final product check before fitting
Are all settings symmetrical?
When at all possible, start with all settings symmetrical.
Give the wearer a chance (2-4 weeks) to see if SWASH®
will help the wearer adjust to more symmetrical posture.
Do the uprights move freely and easily?
The uprights should always move freely and easily in a
full ellipse. If they don't, check that the Allen screw in the
retaining ring in the joint center is properly seated into
the groove in the upright.
Are the uprights in correct RIGHT and LEFT posi-
Fitting the patient
Open all closures on the orthosis. Reapply the orthosis to
There is an engraving or blue label on the upright that
the patient.
identifies left and right. Another way to check is to be certain the long horizontal groove in the proximal end
Check for correct pelvic band height and that the orthosis
of the upright that slides through the joint assembly should
is not rotated on the child.
always be facing up.
SWASH® Low Profile
Are the cuffs on appropriate upright?
The cuffs are a cone shape and the large circumference
Secure the pelvic band studs into their slots and snap the
should be on top and the straps should close to the lateral
circumference strap closed.
side. If this is not the case, remove the cuffs and switch to opposite uprights.
SWASH® Low Profile
Center the abdominal pad on the patient. Grasp each strap
Are the thigh cuffs rotated to appropriate angle?
and pull simultaneously to assure symmetrical application.
The retaining ring that connects the thigh cuff to the upright must not touch the sitting surface when the patient is sitting. Generally, rotating the cuff approximately 10° posterior from mid-line is sufficient.
Does the abduction angle prevent the cuffs from
touching?
A good starting point is 1 to 2 inch (2.5 - 5 cm) gap between
the cuffs when you glide the uprights to the standing position.
This angle will generally need to be re-adjusted after the
SWASH® Low Profile
function fitting, depending on the primary goals of the or-
Secure the thigh cuffs. Adjust the hook and pile closure
thotic intervention and the amount of tone during function.
and check for a snug but comfortable fit.
If the patient is ambulatory, one goal for final fitting is to have the cuffs barely touch each other as the patient walks.
SWASH® Low Profile
SWASH® Low Profile
1. Check the height and rotation of the orthosis on the
2. Insert at least three fingers of one hand between the
child. Make sure that the pelvic section is located below
padding and the abdomen to assure a comfortably snug fit
the naval and encases the ASIS, and that the patient is not
and the patient's comfort.
rotated in the orthosis.
SWASH® Low Profile
SWASH® Low Profile
3. Flex the hips to 90° to check the position of the uprights
4. Check both limbs with the knees at 90° that there is no
relative to the greater trochanters. The uprights should be
impingement on the popliteus or the gastrocnemius. If the
as close as possible to the greater trochanters without
thigh cuffs are too high or if they are too low and causing
impinging on them with the hips flexed. If there is impinge-
impingement on the popliteus or the gastroc, mark a more
ment or if the distance is too great, remove the orthosis
appropriate height on the upright, remove the orthosis, and
and adjust the distance of the uprights through the hip joint
adjust the cuffs to the new position.
assemblies. Check to be certain that the desired abduction setting has not been altered. Re-apply the orthosis.
SWASH® Low Profile
5. Have the patient sit on a bench. Check that the location of the retaining rings are symmetrical and are not hitting the sitting surface. Check waist band tightness while sitting.
INITIAL FUNCTION EVALUATION & CUSTOMIZATION
Stability during sitting is usually a fairly immediate improve-
In initially setting up the orthosis, it is difficult to judge
ment with the SWASH®. Sometimes a few minutes of fun
the amount of abduction required to eliminate scissoring
activities may be required to learn that now they do not
during gait. The goal is for the thigh cuffs to come as close
have to touch balance to sit comfortably. More time will
together as possible, yet offer sufficient abduction to im-
al ow them the opportunity to improve reaching and other
prove hip alignment, posture and gait control, and prevent
upper extremity functional capacities and a more erect
Customization
Patient continues to scissor:
If scissoring is still hindering gait, remove the orthosis and
increase the amount of abduction. For minor increases
in abduction, the thigh cuffs may be externally rotated. In
some cases of higher adductor tone, it may be appropriate
to exaggerate the amount of abduction to provide a wider
base during gait just for the first week or two.
Toeing out
Suggest the patient be evaluated for external tibial or femoral
torsion. Sometimes internal hip rotation can disguise tibial
torsion, so even though the patient's feet don't toe-out
without SWASH®, with SWASH® on and internal rotation
minimized, the tibial torsion becomes more apparent.
Residual Internal Rotation
Many children will demonstrate a more erect and stable
Even with the SWASH® in use, there may be residual in-
standing posture. It may take some time to become ac-
ternal rotation of the lower extremities. Very often, unless
climated to their new posture and elevation. Cervical
there are internal tibial torsion or metatarsus adductus issues,
hyperextension and spinal rotation should diminish as
the medial hamstrings have been seen to exert this internal
pelvic stability increases. Improvements in standing balance
rotary influence. A walking program along with specific
and stability may be demonstrated after a few hours or days.
medial hamstring stretching has been seen to minimize this residual internal rotation.
Walker, Standing Frame, and/or Crutch Height
Evaluate the height of any external walking aids with the
patient wearing the SWASH®. They will often need to be
raised to accommodate to the new stance height.
INITIAL FUNCTION EVALUATION & CUSTOMIZATION
Too much trunk flexion
Interference with Baclofen Pump
When sitting in SWASH®, ADduction of the legs along
or Feeding Tubes
with tight hamstrings may produce a posterior rotary influ-
This is not usually an issue with the Low Profile model since it has
ence on the pelvis, creating a flexion influence on
less abdominal coverage, but can be an issue with the SWASH®
the trunk. This is more pronounced with the use of
Classic. Upon approval from the referring physician, use a heat
123 degree uprights and less pronounced with the
gun to "bubble out" the plastic, allowing space for the pump. Or,
115 degree uprights.
cut a hole large enough for relief of the pump and then use a
If the condition persists, try one or a combination
heat gun to flare out the edges so they are not pressing on the
of the following:
tissue around the pump.
a) Change position of thigh cuffs from distal femur to distal 2/3 femur.
Pressure on the rib cage
b) Set the hip joints for less abduction.
This is usually due to thigh cuffs being fit too distally on the thigh.
c) Rotate the thigh cuffs laterally, increasing the 10o lateral Move the cuffs up to approximately 2/3 distal on the thigh.
rotation that is generally recommended.
d) Depending on the patient, additional anterior or
Cuffs are too large
posterior padding may stimulate a proprioceptive
There are two options: The cuffs can be trimmed and straps
response to shift into more trunk extension:
adjusted accordingly. Or, go to the next smaller size cuff. For
1. Add a longer foam pad to the posterior aspect of
SWASH® Classic, cuffs are interchangeable for sizes 2-4. In addi-
the pelvic band or add a sitting wedge (thicker part tion, there is a special size 1A cuff that will fit the 7 mm uprights under seat, narrow part under legs).
on larger sized units.
2. Insert a thin pillow or foam pad (slightly larger than the abdominal pad) between the abdominal pad and
Cuffs are too small
the abdomen.
Fit the next larger sized cuff.
Too much trunk extension:
Posterior section of SWASH® Classic is too long
a) Check the style (115 or 123 degree) of the uprights
Verify correct sizing. If size is correct, trim posterior section
(find this engraved or on a blue label on the upright).
with heavy duty shears.
The 123 degree will influence more flexion.
b) Recommend the child always sit in a chair with a back rest; if needed include a hip strap to avoid sliding forward. c) Set the hip joints for slightly more ABduction. This will increase the flexion influence of the orthosis on the trunk.
THE PROFESSIONAL FINISH
Cut the uprights to proper length
Congratulations! you are now ready for the Post-Fitting
Once the team has approved the orthosis, the uprights should be
Evaluation (Refer to Clinical Manual). Be sure to docu-
trimmed so that the distal tips are at the same level as the bot-
ment the Post-Fitting Evaluation so you have a record of
tom of the padding on the thigh cuffs. Ensure the ends are roun-
functional improvement when compared to the Pre-Fitting
ded and polished smooth. Push on the protective rubber tips.
Teach caregiver to apply
Demonstrate and then ask the caregiver to apply and remove the
orthosis to help assure appropriate caregiver compliance.
Protocols and proper fit guidelines
you will find this in the Clinical Manual.
Benefits and outcomes
This is in the Clinical Manual and may help in the preparation of
documents for submission for insurance.
Frequently asked questions
Also in the clinical manual, this contains many of the questions
asked by both referral sources, therapists, patients, and caregivers.
SWASH® Referencelist 1 R. N. Boyd et al., The effect of botulinum toxin type A and a variable hip abduction orthosis on gross motor function: a randomized controlled trial. European Journal of Neurology 2001, 8 (Suppl.5): 109-119.
2 Dianne Russel et al., Canada Child Centre for Childhood Disability Research, Hamilton, Ontario, Canada, AACPDM Conference, Washington, DC, 1999
3 Danielle Truscelli, Philippe Toullet, Philippe Lancert, SWASH Preliminary report published on the French medical publication "la letter de medicine physique & de réadptation" December 1999
4 Report from "The 15th Scientific Meeting of the Japanese Society of Prosthetics and Orthotics", November 27 - 28, 1999, Hiroshima.
5 Dormans, J.P., Pellegrino, L., Caring for Children with Cerebral Palsy, A Team Approach. Baltimore: Paul H. Brookes Publishing Co., 1998.
6 Batshaw, Mark L., Children with Disabilities. Baltimore: Paul H. Brookes Publishing Co., 1997
7 R.n. Boyd, S.G. Manion, Effect of the Variable Hip Orthosis, newcomen Centre, Guy´s Hospital, London, England, Interbor Conferece, Oslo, 1996
8 R.N. Boyd, New Horizons in Cerebral Palsy, ISPO Melvourne Australia 30-31 March 1995
9 Atyer-Acevedo, Jane, Physical Therapy for the Child with Cerebral Palsy. Pediatric.
10 Physical Therapy, Second Edition, Philadelphia: J.B. Lippincott Company, 1994
11 Scherzer, Alfred, Tscharnuter, Ingrid, Early Diagnosis and Therapy in Cerebral Palsy, New york: Marcel Dekker, Inc. 1990
12 Houkam et al., Treatment of Acquired Hip Subluxation in Children with Cerebral Palsy, Journal of Pediatric Orthopedics, Vol. 6, No. 3, New york: Raven Press, 1986
13 Folio R., Fewell R., Peabody Developmental Motor Scales and Activtiy Cards, Chicago: The Riverside Publishing Co., 1983
14 Paul A.R. Meyer, MRCP, A Variable Abduction Brace to Treat Hip Subluxation in Cerebral Palsy, Addenbrooke´s Hospital, Cambridge, England
15 Jan F.A. Smits, A New Approach for Dynamic Hip Orthotic Management of the Child with Cerebral Palsy
ALLARD INTERNATIONAL
c/o Camp Scandinavia AB
Karbingatan 38
www.allardint.com Tel +46 42 25 27 00
SE-254 67 Helsingborg SWEDEN
Fax +46 42 25 27 25
Source: http://camp.se/media/files/other/H%C3%B6ft/Instruktioner/SWASH/Allard_SWASH_Fitting_April09.pdf
LAND DER PALMEN UND BLUMEN Blumenriviera – Côte d'Azur Die Côte d'Azur – wie die französische Riviera genannt wird – ist wohl das schönste Stück Erde in Europa. Das azurblaue Meer, die roten und gelben Felsen, die sich im klaren Wasser spiegeln, die subtropischen Pflanzen wie Palmen, Zitronen- und Orangenbäume, das pulsierende Leben in den
SUORE MINIME DELL'ADDOLORATAVia C. Tambroni, 13 - 40137 Bologna - Tel. 051 341755-342624 POSTE ITALIANE S.P.A. - SPED. ABB. POST. D.L. 353/2003 (CONV. IN L. 27/02/2004 N. 46)ART. 1, COMMA 2, DCB - BO - ANNO XLVII - PUBB. INF. 50% - STAMPA: DIGI GRAF - BOLOGNA Giornata mondiale della pace Nel Messaggio per la XLVII Giornata Mondiale della pace,